


Resize an Embroidery Design Without Losing Quality
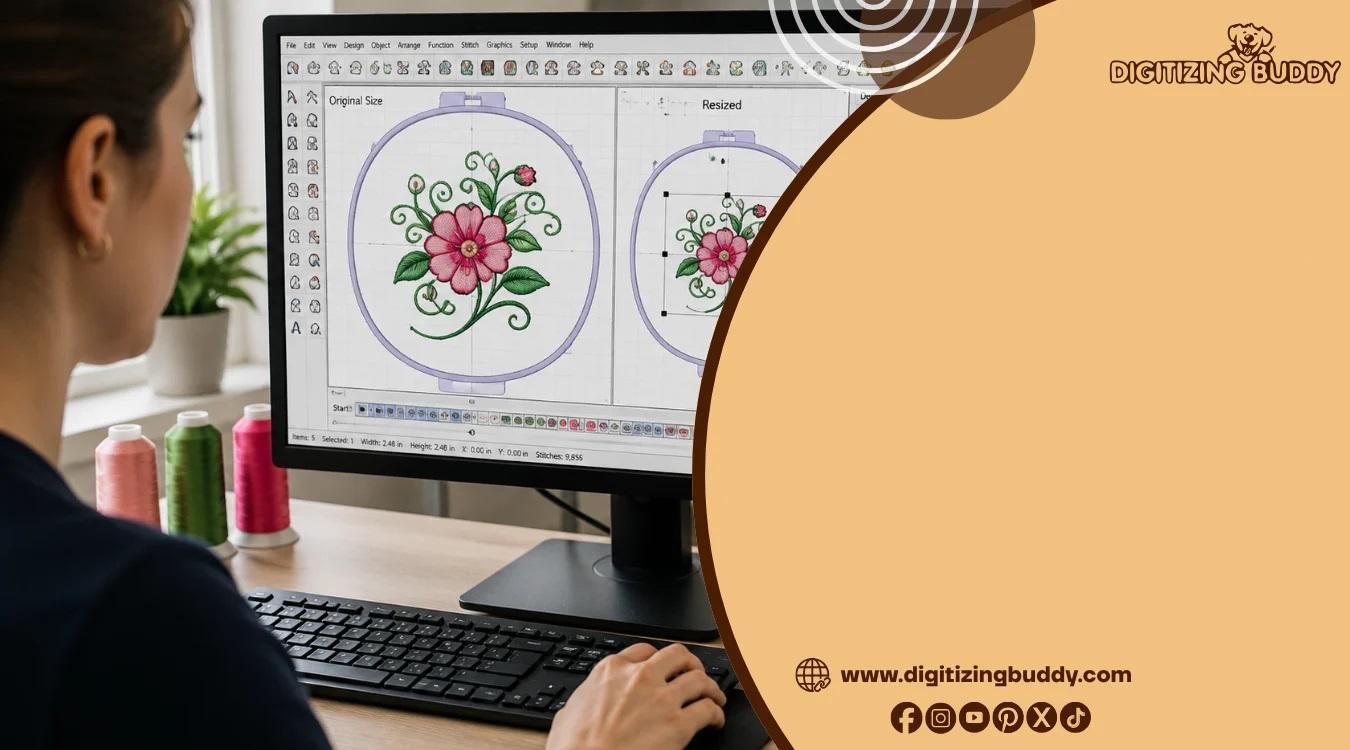
A design can look perfect on your computer and still turn out poorly when stitched at a different size. Maybe the logo needs to fit a small shirt pocket, or a large jacket design needs to be reduced for a cap. This is where knowing how to resize an embroidery design correctly becomes important.
Embroidery designs are not ordinary images. They contain stitches, densities, underlay, stitch directions, and other details that affect how the design sews. Simply making the design larger or smaller can change how those stitches behave.
In this guide, you'll learn how to resize embroidery files safely, when resizing works, what problems to watch for, and when a design should be professionally re-digitized.
What Does It Mean to Resize an Embroidery Design?
Resizing an embroidery design means changing its physical dimensions while preparing it to stitch correctly at the new size.
For example, you may have a logo that is 4 inches wide but need it at 3 inches. You can scale the design down, but the stitch structure may also need adjustment.
This is different from resizing a JPG or PNG. An image can often be scaled without changing its basic structure, while an embroidery file contains detailed stitch information.
Why Is Proper Embroidery Design Resizing Important?
Changing the size of an embroidery design affects more than its appearance.
When a design is resized too much, you may notice:
- Tiny lettering becoming unreadable
- Narrow columns becoming too thin
- Fill areas losing proper coverage
- Stitch density becoming unsuitable
- Underlay no longer supporting the design
- Excessive thread buildup
- Gaps between design elements
- Fabric puckering
The goal is not simply to make the design fit. The goal is to make it fit and stitch properly.
How to Resize an Embroidery Design
The exact controls depend on the embroidery software you use, but the basic process is similar.
1. Open the Original Embroidery File
Start with the original embroidery file whenever possible.
Avoid repeatedly resizing a previously resized file. Keeping the original gives you a clean starting point if you need to make several size variations.
Common embroidery formats include:
- DST
- PES
- JEF
- EXP
- VP3
- HUS
- PXF
Make sure your software supports the file format you're working with.
2. Check the Original Design Size
Before making changes, record the original dimensions.
For example, suppose your design is:
4 inches wide × 3 inches high
If you need it at 3 inches wide, you can calculate the scale percentage:
3 ÷ 4 × 100 = 75%
So the design would be reduced to approximately 75% of its original size.
Keeping the proportions locked helps prevent the design from becoming stretched or distorted.
3. Maintain the Original Proportions
Always try to preserve the design's aspect ratio.
If you change the width without adjusting the height proportionally, a circular logo could become oval, while lettering may appear stretched.
Look for a setting such as Lock Aspect Ratio, Maintain Proportions, or a similar option in your embroidery software.
4. Consider the Stitch Count
One common misunderstanding is that resizing automatically creates the perfect stitch count for the new dimensions.
It doesn't always work that way.
When a design is reduced, stitches can become crowded. When enlarged, stitches may become too far apart. Depending on the software and the amount of resizing, you may need to recalculate or adjust stitch parameters.
This is why professional embroidery digitizing is often better than simply scaling a finished file.
5. Inspect Small Details
Pay close attention to:
- Small lettering
- Thin outlines
- Narrow columns
- Small gaps
- Sharp corners
- Fine decorative elements
These areas are usually affected first when a design is reduced.
For example, text that looks clear at 4 inches may become difficult to read at 2 inches. In that situation, shrinking the entire design may not be the best solution.
6. Review Stitch Density
Stitch density determines how closely stitches are placed in an area.
When you make a design smaller without properly adjusting its stitch structure, the stitches can become too concentrated. This may create unnecessary thread buildup and make the embroidered area stiff.
When making a design larger, the opposite problem can occur. Stitches may become too spread out and leave visible fabric between them.
Always review density after resizing.
How Much Can You Resize an Embroidery Design?
There is no single percentage that works for every embroidery design.
A simple design with large shapes may tolerate more resizing than a detailed design with tiny lettering and narrow columns.
As a general rule, small changes are usually safer than extreme changes.
For example:
- A modest size adjustment may work well.
- A major reduction can damage small details.
- A major enlargement can create poor coverage.
- Complex designs often need re-digitizing for a different size.
The ideal approach depends on the design, fabric, thread, stitch types, and final application.
Why Automatic Resizing Can Cause Problems
Many embroidery programs allow you to resize a design with a few clicks. That's convenient, but automatic scaling doesn't always understand how thread behaves.
Imagine shrinking a detailed drawing on paper. The drawing gets smaller, but the pen marks remain proportional. Embroidery doesn't work exactly like that.
Stitches interact with fabric. They have direction, density, pull, and coverage. Changing the design dimensions can affect all of these factors.
That is why embroidery design scaling should be checked carefully rather than treated like ordinary image resizing.
Resizing vs. Re-Digitizing: What's the Difference?
This is an important distinction.
Resizing
Resizing changes the dimensions of an existing embroidery file.
It can be useful when the new size is relatively close to the original and the design structure remains suitable.
Re-Digitizing
Re-digitizing means rebuilding the embroidery design for a specific size.
The digitizer can adjust:
- Stitch types
- Stitch density
- Underlay
- Stitch direction
- Pull compensation
- Lettering
- Object shapes
- Stitch sequence
If you need a significantly different size, re-digitizing can produce a much better result than simply scaling the existing file.
Example: Resizing a Logo for Different Clothing
Imagine you have a company logo digitized at 4 inches wide.
You want three versions:
- 4-inch jacket logo
- 3-inch shirt logo
- 2-inch cap logo
The 4-inch version may work well as it is.
The 3-inch version might require minor adjustments to density and small details.
The 2-inch version could require more substantial changes, particularly if the logo contains small text.
In this case, creating size-specific versions is often better than using one file for everything.
How Fabric Affects Embroidery Resizing
The same design can behave differently on different fabrics.
A stable fabric may support detailed embroidery well, while stretchy or lightweight fabric may require additional stabilization and adjustments.
Before resizing a design, consider the material you'll stitch on.
For example:
Cotton
Cotton can provide a stable surface, but stabilizer selection still matters.
Stretch Fabrics
Stretchy materials can move during stitching, making proper stabilization and pull compensation especially important.
Caps
Caps have curved surfaces and limited space. Designs for hats often require specialized digitizing rather than simply shrinking a flat embroidery design.
Tips for Better Embroidery Design Resizing
Use these practical tips before sending a resized file to your embroidery machine:
- Keep a copy of the original file.
- Lock the aspect ratio.
- Check the final dimensions carefully.
- Inspect small lettering.
- Review stitch density.
- Look for very narrow columns.
- Check underlay and stitch direction.
- Consider the fabric you'll use.
- Avoid extreme resizing when possible.
- Test stitch the design before bulk production.
A quick sample can reveal problems that aren't obvious on your computer screen.
Common Embroidery Resizing Mistakes
Making a Design Too Small
Tiny details may disappear, while small lettering can become unreadable.
Enlarging Without Checking Coverage
A significantly enlarged design may have insufficient stitch coverage, leaving fabric visible.
Ignoring Stitch Density
Scaling the dimensions without reviewing density can cause excessive stitches or poor coverage.
Stretching the Design
Changing width and height independently can distort the original artwork.
Using One File for Every Size
A design intended for a large jacket may not be suitable for a small chest logo or hat.
Skipping a Test Stitch
A digital preview cannot always show how the design will behave on actual fabric.
When Should You Get Professional Help?
If you only need a small size adjustment to a simple design, resizing software may be enough.
However, professional assistance is worthwhile when:
- The design contains detailed artwork.
- Small text must remain readable.
- You need multiple production sizes.
- The design is being used commercially.
- You're resizing it significantly.
- You're getting thread breaks or puckering.
- The resized design doesn't stitch cleanly.
At Digitizing Buddy, embroidery designs can be prepared with the final application in mind rather than simply changing their dimensions.
How to Test a Resized Embroidery Design
Before producing multiple garments, make a sample.
A simple testing process is:
- Load the resized file onto your embroidery machine.
- Confirm the hoop size and design dimensions.
- Use the intended fabric and stabilizer.
- Stitch the design.
- Examine lettering and fine details.
- Look for gaps, puckering, or excessive density.
- Check thread breaks and unnecessary trims.
- Adjust the design if needed.
This small test can prevent expensive production mistakes.
Frequently Asked Questions
Can I resize an embroidery design without losing quality?
Yes, but the amount you can safely resize depends on the design. Small adjustments are generally easier, while major size changes may require re-digitizing.
Does resizing change the stitch count?
It can. Depending on the software and resizing method, the stitch count may change or the existing stitch structure may simply be scaled. Always inspect the final file.
How much can I enlarge an embroidery design?
There is no universal limit. A simple design may handle enlargement better than a highly detailed one. Significant enlargement often benefits from re-digitizing.
Can I make an embroidery design smaller for a hat?
Sometimes, but hat embroidery has special requirements because of the curved surface and limited stitching area. A dedicated hat version may produce better results.
Should I resize or re-digitize my embroidery design?
For minor size changes, resizing may be sufficient. For significant changes or designs containing small details, re-digitizing is usually the safer option.
Conclusion
Learning how to resize an embroidery design is useful when you need the same artwork for different garments, hoop sizes, or applications. However, embroidery files are more complicated than ordinary images. Changes in size can affect stitch density, lettering, coverage, underlay, and the way the design behaves on fabric.
For small adjustments, careful scaling and testing may be enough. For major size changes, creating a properly digitized version for the new dimensions can deliver cleaner and more reliable embroidery.
The key is simple: don't resize just to make a design fit—resize it so it can stitch well.
Categorie
Leggi tutto
Achieving optimal tissue approximation and wound closure across delicate surgical procedures relies heavily on high-performance material selection. Detailed analysis within the Suture Market report demonstrates how synthetic absorbable polymers—such as polyglactin and poliglecaprone—deliver predictable tensile strength retention and smooth absorption profiles. Surgeons across...

Market Overview The extracellular matrix (ECM) patches market is expanding as regenerative medicine increasingly relies on biological scaffolds to support tissue repair across cardiac, wound care, and soft tissue applications. Derived from decellularized animal or human tissue, these patches provide structural support that promotes native cell infiltration and healing. The Extracellular Matrix...
A blurry logo can make an otherwise professional brand look unfinished. When artwork needs to appear on a large banner, business card, product label, or promotional item, image quality matters. This is where Premium Vector Art Conversion can make a real difference. The process transforms raster images such as JPG, PNG, or BMP files into clean, scalable vector artwork that can be resized without...
Market Overview The video laryngoscope market is accelerating as airway visualization technology transforms anesthesia, emergency medicine, and critical care practice worldwide. Clinicians are replacing direct laryngoscopy with video-enabled blades that display glottic anatomy on high-resolution screens, reducing failed intubation rates. The Video Laryngoscope Market is projected to grow...
Market OverviewEnvironmental safety is becoming an increasingly critical concern in Italy, significantly influencing the solid phase extraction market. As regulations surrounding environmental protection tighten, industries are required to adopt sustainable practices and reliable analytical methods for monitoring contaminants. Solid phase extraction offers a more environmentally friendly...